Nothing could be simpler - take a pair of scissors, cut some tips off a plant, place the cut tips into a medium and away they go, right?
Wrong. Okay, then take a pair of scissors, cut some tips off a plant, place the tips in a propagator and away they go, right? Sorry, wrong again. While the steps are correct, there is much more to consider to ensure success with cuttings. Expensive equipment is not the answer, doing your homework is. Plant cuttings are a reflection of their origin.
Plant cuttings (a cutting is a small piece of plant which contains at least one stem cell of the parent(stock) plant. The cutting should be placed in a suitable medium and encouraged to grow as an independent plant) are a part of the original stock plant (the plant which is used to obtain propagating material, plant cuttings are taken from the stock plant) and they share the same balance of light, air, water, and nutrients as the stock plant. The plant which grows from a cutting will show any problem (i.e. nutritional deficiency) rapidly and throughout its development.
Prepare the stock plant
The stock plant needs to be growing actively but not forced to grow too fast as we want to force the cutting to form roots and minimise the risk of it having a vegetative growth surge. Ensure the stock plant is being fed on a regular basis but do not give it too many nutrients (especially nitrogen), as this will cause an imbalance in carbohydrate storage, resulting in soft cuttings that have little energy for rooting.
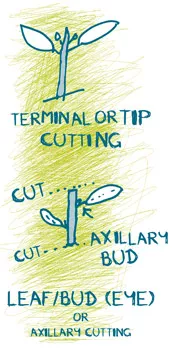
If you are working only with terminal cuttings (there are 2 basic types of cuttings, terminal or tip cuttings and leaf/bud or auxiliary cuttings. A leaf/bud or auxiliary cutting has one or two leaves with an auxiliary bud that sprouts into a new plant, with no terminal. Terminal or tip cuttings root and grow easily and faster than a leaf or bud cutting.)
You also want to avoid any other nutrient deficiencies - Keep the light level up during growth periods, but reduce the amount of light the stock plants are exposed to by one third in the week before you take your cuttings. If you reduce the light level too much, you will induce internode stretch. Once you have taken the cuttings, which can be as big of a shock to the plant as loss of roots, transfer it into a reduced light environment.
Make sure you water your stock plant the day before you take cuttings and it is best to take your cuttings during the first hours of light. It is also wise to make sure that the stock plant has been in a stable growth routine and has not dried out in the preceding two weeks. A stable, vigorous, healthy stock plant will yield cuttings of similar quality.
Prepare to take cuttings
Now that we have ensured that the stock plant is as healthy as it can be, it must be time to get out the scissors…...No! Taking a cutting requires care! You want to make good use of every possible cutting, and so minimise the number of stock plants and the amount of space required for keeping up production. It also will result in even rooting between cuttings with a lower number of ‘blind’ cuttings (auxiliary cuttings where the cutting roots but none of the buds on the cutting develop into a new plant).
There are 4 different types of cuttings to consider:
- Hardwood (deciduous species)
- Hardwood (narrow leaf evergreen species)
- Semi-hardwood
- Softwood (greenwood) cuttings
There are also many ways to cut and treat cuttings depending on the type of cutting.
These methods are based on the type of plant (woody to soft), production time (seasonal changes) and end-use. The softwood approach will be used to demonstrate the steps involved, as it is common to all types of plants, although it is confined to spring growth for woody plants.
Where to cut?
There is a zone on every plant stem that goes from low carbohydrates and high nitrogen to high carbohydrates and low nitrogen; you want the middle of this zone. How do you tell where this is? Most growers know this from experience, but new or less experienced growers might want to do the ‘bend test’. You bend a tip still on the plant at a point where you want to take the cutting back on itself. There are three things that could happen:
- It bends (high nitrogen and low carbohydrate)
- It snaps in half or nearly in half (low nitrogen and high carbohydrates)
- It partially breaks in one spot (just right). This spot is the cut zone. This is the section of the stem where roots will most readily form. Next we need to know where on the stem to cut.
How to cut?
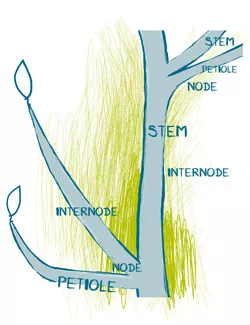
The internode is the section of the stem between leaf sets. Some plants form new roots from the node (the stem of a plant is divided into nodes and internodes, the nodes hold buds which grow into one or more leaves, flowers, cones or other stems), where the leaves attach), some form them along the internode section. The key is to cut as close to the node as possible on those plants that form at the node and halfway for those that root along the internode.
Now for the big news … cut it straight, not angled! (editor’s note: cutting at an angle is not a bad practice, but the chance of getting bacterial and/or fungal disease in your cutting is slightly higher. The advantage of cutting at an angle is that the cutting is likely to develop more roots.)
It is difficult to avoid crushing the tissue at the cut, but the impact can be reduced by selecting the correct cutting tool. It really depends on the material being cut. Herbaceous material and very thin woody material are best cut with a specialist knife, called a propagation or budding/grafting knife. The next best option is bypass pruners. Scissors, anvil pruners, and fingers should be avoided as they crush the stem and don’t produce a clean cut.
Be kind to your cuttings
All cuttings need to go directly to an environment with 100% humidity after being cut.Keep them dark, cool and moist. Should we allow the cuts to dry out a little before sticking them in medium?
No - while herbaceous cuttings are less likely to rot, they also root faster than woody plants because they contain less lignin in their stems. Don’t give them time to dry out. A word of caution here - if you, the grower, use a rooting chamber that sprays a mist onto the cutting stems but does not include top humidity control, it might be advisable to cut the cutting stems at an angle to allow for water penetration, since these propagation units depend on this to regulate the supply of water to a cutting.
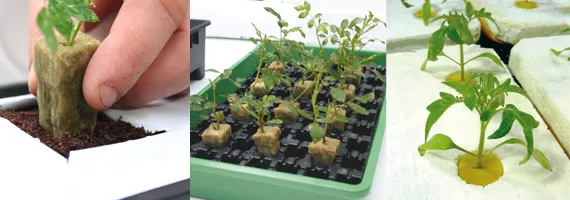
Rooting medium
The media for rooting should be similar to the medium that will be used for growing the cuttings in later: you must match the properties. Plants develop new roots with characteristics suited to the particular medium and the subsequent job they must do. Avoid sticking the cuttings in too deep - while tomatoes can handle being transplanted deep, most plants cannot. For plants that root at the node - bury the node, for plants that don’t root at the node - leave the node above the medium.
Finally, make sure you water the cuttings when you’ve finished. This ensures a seal develops on the stem and settles the cutting into place.
Growing conditions
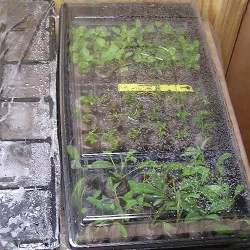
Now what’s the next step? Let’s see, we fed the stock plant, took the cuttings, transferred the cuttings into a suitable medium… now we need to get them under 100% humidity. This can be achieved with a dome or a mist system.
Humidity is essential to keep the leaf turgid, the systems functioning, and the processes processing. Keeping the lights at a lower intensity will enhance rooting while decreasing leaf function to survival levels. It will slow transpiration while the necessary components are used at the root sites to build a new root structure. Keep the atmosphere around the cutting warm (not hot), keep the humidity relatively high (>90%), and keep the root zone temperature warm (at about 25°C).
Maintain this humidity until you can see callus tissue or root initials (the first signs of root development) then you can allow the cuttings to grow at below 90% humidity but above 80% humidity in order to encourage root growth. When you can see roots in the surrounding medium, it is time to reduce to 80% humidity and stop spraying water on the leaves in order to limit risk of disease.
When the roots reach the outside of the root cube or pot, transplant them.
When to transplant cuttings
The timing here is important. If you wait until the roots have grown into a root ball, the roots will be old, ‘pot-tight’, and likely to grow on with less branching. Don’t wait until the roots have grown too much. Do not apply stimulants (hormones) until the cuttings are transplanted. If you are rooting your cuttings into a medium, then use stimulants as soon as you notice the roots (some stimulants can be supplied through the leaf earlier).
A critical point to make at this juncture: roots require 100% humidity to avoid damage. The longer the root tips are exposed to air, the greater the damage that is done. Only harvest, or remove from the starter trays exposing the roots, enough material that you can deal with in 15 minutes. Once planted in the medium, always water your transplants in, with or without feed, depending on the medium and always adjusted to the bare minimum needed.
Transplanting cuttings: best practice
A cutting that is being transplanted the first time should not be forced to swim in a huge pot that contains an ocean of media. It is not wise to place a 4-inch cutting directly into a 20 litre container, as it is not efficient use of space and it is difficult to keep the climate under control in such a large container. Transplant it into a smaller container first and allow it to gain root volume, then transfer it into a larger container.
Feed new cuttings and plants lightly and increase the amount of fertiliser you give to your young plants in proportion to the rate of root growth. Foliar feeds can be applied to leaf surfaces but in light amounts. Beware that nitrogen and some other elements have a tendency to leach out of leaves under a mist system. Usually, a light amount of foliar feeding* is recommended where roots form in less then five days. The root system is considered to be the best way to feed the plant and this holds true throughout the plant’s life.
Follow these steps carefully, take care of the stock plant and cuttings and you will succeed!
*CANNA RHIZOTONIC is a popular product for use in foliar feeding. Sprayed on leaves of your cuttings it will speed up the rooting process, increase resistance against diseases, and it will improve the quality of the crop.
